Spring Clean Up: How to Clean Walls and Trim for a Brighter Home
Let’s talk about something that doesn’t always get the spring clean up love it deserves: your walls and trim.
Sure, we dust the shelves and vacuum the floors, but those walls and trim? They quietly accumulate dust, fingerprints, and grime over time.
A spring clean up of your walls and trim is one of the fastest ways to make your home feel brighter and fresher — even before you redecorate for the season.

Why It Matters:
Our walls and trim frame your space. When they’re dull or grimy, the whole room feels tired. But when they’re clean and crisp? Even your existing furniture and décor look more intentional and polished — like you actually have your life together. 😊
Over time, dust, smudges, and kitchen grease build up, especially on high-touch areas like door frames, window sills, and baseboards.
A spring clean up in these areas helps your space feel cleaner, brighter, and more polished. Without a complete room overhaul.
And yes, this does require a little bit of elbow grease. But with the right tools, it’s surprisingly quick and way more satisfying than you’d expect.
Supplies for a Quick and Effective Spring Clean-Up
For a quick and effective spring clean-up, here are my go-to supplies that’ll make your life a whole lot easier (and trust me, they don’t need to be fancy to get the job done!):

- Microfiber Dusting Mitt – I love a good microfiber mitt for quick dusting. It grabs the dust rather than just moving it around, making your job easier with less effort. (Mine is the Norwex Dusting Mitt)
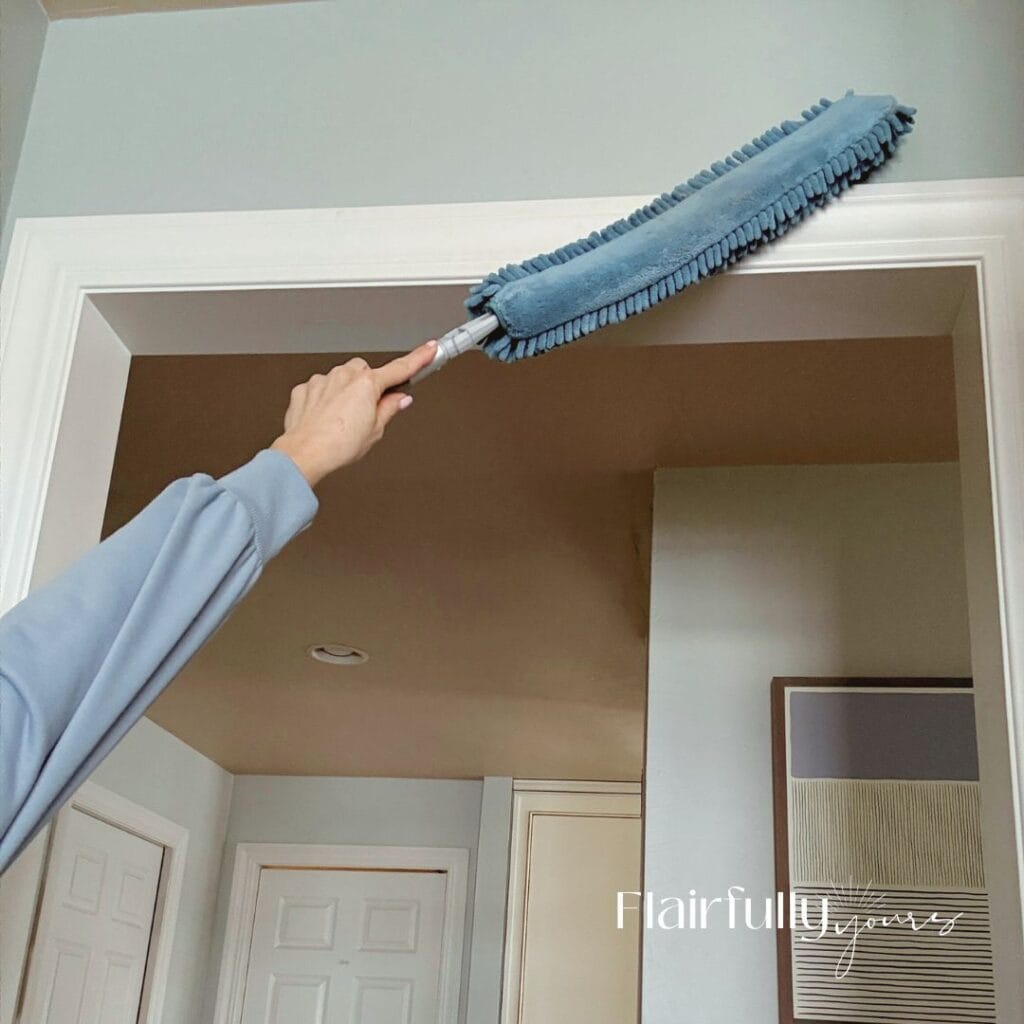
- Dusting Wand – Perfect for those high-up spots like door and window trim or the edges of your walls and celings. The flexible head reaches tough spots without any stretching or awkward maneuvering. (I’m using the Norwex EnviroWand®) Psst—also great for dusting off ceiling fans!
- Microfiber Cloths – Great for wiping down walls and trim without leaving streaks (because who needs extra work?) (Seriously, use these for ALL your cleaning!)
- Zep Foaming Wall Cleaner – This is my secret weapon for those smudges and grime spots. It works on walls and trim without damaging the finish, and it tackles sticky spots and fingerprints like a pro.
Heck YES to tools that make spring cleaning feel less like a chore and more like mission accomplished!
How to Clean Your Walls & Trim (the Easy Way)
Here’s the best spring clean up method I’ve found for getting this done well:
1. Start with a dusting sweep
Before you reach for sprays, grab a microfiber cloth or duster and sweep over your walls and trim. This removes loose dust so you’re not turning it into mud later.
2. Use a foaming wall cleaner you trust
My go-to is Zep Foaming Wall Cleaner. It clings to vertical surfaces, loosens grime, and makes cleanup easier.

- Spray on small sections of wall and trim
- Let it sit for a few seconds
- Wipe with a clean cloth
You’ll be amazed how much disappears on the first pass.

Love this idea? Keep it handy.
3. Don’t skip the trim edges
Corners, baseboards, door frames, and window trim hide the yuckiest build-up. These deserve extra attention — and they’re where you’ll see the most dramatic before/after results.

4. Finish with a damp cloth
Once you’ve cleaned, go over it with a slightly damp microfiber cloth to remove any residue and leave everything crisp and clean.

The Impact:
Here’s the fun part — once your walls and trim are clean:
- The whole room feels brighter
- And smells so much fresher
- Your color choices stand out more
- Even old accessories look newer and fresher
- You’ll probably notice other spots that need a little love—like dusty picture frames, light fixtures, or door handles—so be ready for the snowball effect! (Sorry, not sorry 😆) But hey, the more you clean, the fresher your space will look and feel.
Spring Refresh Ideas to Pair with This
Cleaning your walls and trim sets a strong foundation. Now let’s build on it with a few quick, stylish updates for your home decor:
1. Spring Cleaning Checklist: Home Decor Refresh
My spring clean up checklist walks you through 30 simple tasks that help you reset your entire home for spring. From textiles to lighting, décor placement to storage refreshes.
Download this handy checklist and tackle your spring cleaning with ease.

2. Simple Spring Home Updates
Once the walls and trim are clean, head to this roundup of easy, style-forward ideas (no full room overhaul!) to bring brightness and spring energy into your space. Like swapping out heavier fabrics, refreshing throw pillows, and bringing in seasonal greenery.
👉 15 Easy Hacks to Energize Your Home for Spring
And if you want a style direction to take things further…
3. Add a Touch of Coastal Color
After your spring clean-up, consider updating your color scheme with one of my St. John-inspired coastal palettes — easy-to-use color combinations that bring breezy, island energy into any room.
👉 Explore all 9 palettes here: St. John-Inspired Coastal Color Palettes
Ready to kick off your spring clean-up? Grab your supplies, put on your favorite playlist, and enjoy the transformation! Once your walls and trim are sparkling, it’s the perfect time to add a pop of coastal color or swap out textiles for a fresher, lighter feel.